The complete guide to entering PICTURES
First of all, this manual looks elaborate, but that's just because it explains every option. Posting is really quite easy. Read this page once, and you'll know what applies to you. And remember, we are happy to post your work for you: just email us at admin@faramirfiction.com.
If you don't have a password yet, get one first.
Log in here, and you'll land right on the form where you can enter all the data for your picture. However, you'll first need to upload it. Compare it to posting your artwork on a blog: first you upload it somewhere, then you create a new post about the picture to show it off.
Notice that there is a link to these instructions whenever you need them: the tab in the top right corner that reads 'posting help'. The link opens in a new window or tab.
There are also hints to go with each item: just click on the ? next to it!
There are two parts to posting a picture: (1) you have to upload it, and then you have to (2) post an article about it that holds all the information such as the title and rating, and that will receive any comments.
1. Uploading your picture
There are two ways to upload your image: from the 'Edit' screen (the page you use to post story and picture articles), or from the 'Image' screen.
Using the upload box on the 'Edit' screen (just below the big 'Body' box) is quickest and easiest if you don't need anything special. Just find your image and upload. You'll notice that an image ID will automatically appear in the Article Image ID box.
However, if you need to upload a custom thumbnail (e.g., because your image is too explicit to be simply scaled down), or if you want to replace your image with an updated version, you'll need to use the 'Image' screen. Click on the tab that says 'images' in the navigational part at the top of the (two to the right of the 'Edit' tab).
Upload your file using the 'upload file' box. When it's uploaded, you'll be redirected to a page displaying your image, where you can enter more details about it. Here you need to either create or upload a thumbnail.
Thumbnails
All thumbnails at the Faramir Fiction Archive are 71 by 71 pixels in size. You can either choose to make a thumbnail yourself and upload it using the upload thumbnail box, or have a thumbnail automatically created. If you want to generate one, enter "71" in both the 'Width' and 'Height' boxes under 'Create thumbnail', tick the 'crop' box, and click 'create'.
NB: If your picture is explicit in any way, please make your own thumbnail and use a non-offending detail of your picture as thumbnail. Do not use the automatically generated thumbnail, as this will create a miniature version of the full picture.
You do not need to change anything else in this screen. An alt text or caption will not appear on the site. Hit 'save' and you'll be returned to the 'images' tab. If your image list is sorted by date, your picture should be top of the list. Remember its ID number (first column in the table) - you'll need to enter it later.
External Images
You can also enter a picture to the archive that is hosted on your own site. In that case the title and the thumbnail link to the URL you enter. But you will still have to upload that thumbnail. The easiest way to do this upload an thumbnail image using the upload box on the 'Edit' screen. It will automatically be scaled down to a 71 by 71 px thumbnail, so when you prepare your thumb, don't make it too large (no bigger than 100 by 100px), or the results may be disappointing.
Entering the details
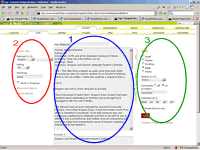
 Now return to the 'Edit' tab. The form consists of three columns,
as marked in the screenshot. The middle one (circled in blue)
is the most important: this is where your pic's title and image go.
On the left (the red section) you can enter more
details, such as the pairings, warnings (where applicable). The section on the right (here in green)
are mostly settings that have to do with the working of the site, such as the
status, the section, and the date. In most cases, all you need to change in the green section is set the section to 'Pictures'.
Step 1: The basics
Title: Enter the title of your picture in the title field.
Body: Not used for pictures - please leave blank.
Article Image ID: If you uploaded your image on the 'Image' screen, enter that image ID remembered from earlier. Just the number, nothing else. If you upload your image using the 'Upload new image' box just below, it will enter an Image ID here automatically.
Step 2a: The details
Pairings: You can select a pairing. This will appear with your picture as for example "with Boromir". You can also leave these blank.
Rating: Please select an appropriate rating for your picture.
Warnings: Please warnings for your picture when appropriate, or leave empty.
Work in Progress: Not used for pictures.
Summary: You can enter a description of your picture or any additional notes here.
External Address: If you want to link to (a page that features) your picture on your own site instead of archiving a full version in the archive, fill in the address to link to here. Remember to leave the body text box empty, but fill out the rest of the form as normal.
If you want to store your picture at the archive, leave this field blank.
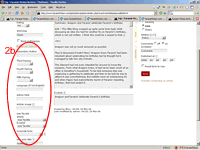
Step 2b: The details - Advanced
 Click on 'Advanced Options' to access the second set of boxes on the left of the screen.
Third / Fourth / Fifth Pairing: See 'Pairings'.
Language (if not English): Not used for pictures - please leave blank.
Step 3: Site Settings
Section: The section you're posting to. Change this on 'Pictures'.
Click on "Advanced Settings " if you want to change those settings.
Status: If you want to post your story right away, select
'Live' (default). If you want the administrators to give it the once
over first, select 'Pending'. If it's not ready for posting yet, select
'Draft'.
'Hidden' and 'Sticky' are for admin use only.
Use Textile: The default editing mode is 'Textile'. This is a simplified way of adding formatting to text. For example, it turns *bold* into bold and _italic_ into italic. Click on 'Textile Help' on the left for more instructions. If you want to work in HTML in your description, select 'Leave text untouched' for excerpt.
URL-only title: By default, all articles receive an URL that matches their title. Should you get an error message saying your story was saved as a draft because there was already an entry with the same name in the archive, you can here change the URL. You could, for example, add your name to the end.
Comments: If you do not want visitors to comment on your story, you can select off. Then no comment box will appear.
Set timestamp to now: If you're publishing a new picture, this will be on by default. Leave it on.
Or publish at: With this function you can either make it appear as if you have entered your picture at some time in the past (if you set the time to some point in the past, or 'backdate' the entry), or already post a picture that you do not want to appear for some time still (if you set the time to some point in the future).
Step 4: Saving & Entering the next Picture
Click the red 'Publish' button to save your picture. Notice that the text 'Article posted' appears at the top of the screen.
To enter another picture, click 'create new'. This will give you a clean,
empty form.
NB: if you enter a new picture by editing a freshly saved one,
you will replace the earlier picture!! Always start with a new form by
clicking 'create new'.
Editing Pictures
Editing the details
If you want to edit any of the details (description, rating, etc.) of your picture later on, you'll first have to locate it. If it's not in the list of 'Your Recent Articles' (bottom left), click on the content » articles tab - the tab just to the right of the Edit tab, where you'll find all your articles.
Besides all your fiction, you'll also find a article in the 'artists' section with your name as title. This is the article that lists all your work. Feel free to edit the body text of this article - you may want to include a link to your site, a short bio, or even the URL to an (external) avatar in the _Article image ID_ field. Just make sure you leave all the settings other than the body text and article image as they are.
Click on any of the titles to edit the article. Notice you can also click on the articles of others, and you will be directed to the Edit screen, but only your own articles have a 'Save' button. You may want to use this possibility if you're unsure about how something is done: sometimes it helps to sneak a peak at another article to see how they did things.
Now editing is just like posting the article in the first place.
Editing the picture itself
If you want to change the picture itself, or change the thumbnail, go to the 'images' tab and click on the name of the picture you want to update. You'll land on on a page that displays your picture plus the picture's details. Right under your picture you'll find a 'Replace image' box where you can upload a new version of your picture. You can do the same for the thumbnail. If you replace your picture in this way, the image ID will remain the same, so you don't have to edit the picture article in the Edit tab.
Filter
Adult content is shown. [what's this?]
Adult content is hidden.
NB: This site is still for adults only, even with the adult content filter on! [what's this?]